Mercury Optimax Fuel System

About the Mercury Optimax
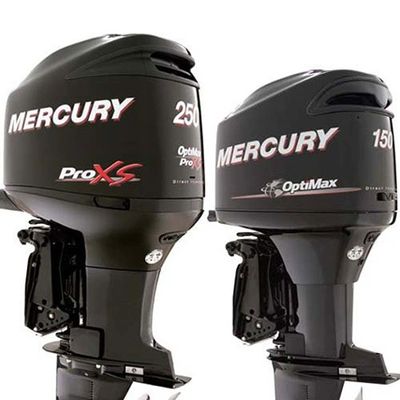
The Mercury Optimax DFI engine is a 2-stroke direct injected motor made and designed by Mercury Marine. Originally introduced in 1995, the Optimax motor was made and sold until 2018, depending on your location the motors were sold under both the Mercury and Mariner names. The motors were made from a 1.5L 75hp, inline 3 cylinder configuration all the way through the 3.2L 300XS V6. This article will specifically focus on the Optimax fuel system, and the differences between the Optimax fuel system, and more conventional fuel systems.
How the Mercury Optimax Fuel System Works
The Mercury Optimax motor is very different from conventional 2-strokes, and the motors previously offered by Mercury and Mariner. Rather than injecting fuel into the crankcase like the previous 2-stroke motors offered, this motor uses a combination of high pressure fuel and high pressure air to inject an atomized mixture of gas directly into the combustion chamber.
The high pressure fuel is provided by a series of 3 fuel pumps, a pulse operated lift pump and 2 electric pumps inside the VST or vapor separating tank. From there the fuel flows to the fuel rail where it is cooled by sea water and delivered to the fuel injectors. A fuel pressure regulator is installed on the fuel rail to relieve excess pressure, the fuel that is let out by this regulator circulates back into the VST tank. This part of the Optimax operates very similarly to most modern fuel injection systems.
But there is more to the Optimax fuel system than that. Another set of injectors called direct injectors are located on the other side of the fuel rail, between it and the cylinder head. These injectors are fed pressurized air from the belt driven air compressor on top of the motor. The air compressor is ran off of the flywheel, as well as the alternator, and is fed cooling water as well as oil for lubrication. The air side of the fuel rail is regulated at 10 - 15 psi less pressure than the fuel side, this specification depends on the exact model, you will see the pressure specs listed below. The fuel pressure regulator is held closed with a spring that requires 10 psi to force the diaphragm off of the diaphragm seat. The backside of the diaphragm is fed with regulated air rail pressure, as the air rail pressure increases, the fuel pressure needed to open the regulator increases equally. The air pressure is less than the fuel, so that the fuel can overcome the air pressure and be properly mixed when injected into the cylinders. The fuel injector is opened by the ECM / PCM, injecting fuel into a machined cavity inside the air chamber on the air/fuel rail. Now that the fuel and air has been mixed the direct injectors spray the mixture directly from the cylinder head into the cylinder. The direct injectors have a cone shaped spray pattern which allows the mixture to atomize very well, even under high cylinder pressures.
Mercury states that the atomized fuel droplets are about 10 microns in size. All of these things in combination are what make the Mercury Optimax fuel efficient and powerful. The better the atomization, the more efficiently fuel can burn, thus giving exceptional power and fuel economy.
In the next section you will see pictures of the following typical Mercury Optimax fuel systems:
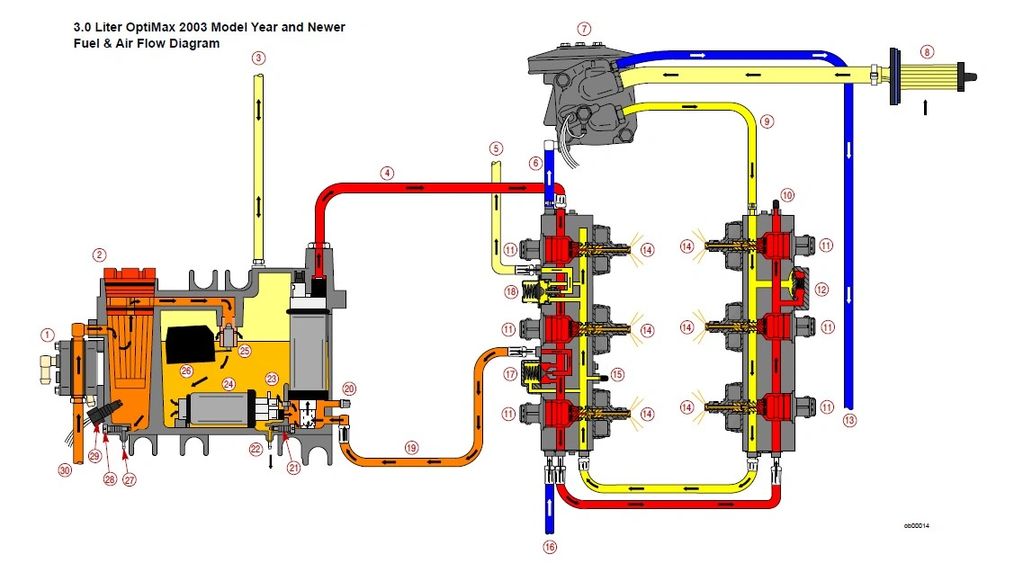
V6 3.0L Optimax Fuel Flow Diagram
V6 2.5L Optimax Fuel Flow Diagram
Inline 3 Cylinder 1.5L Optimax Fuel Flow Diagram - 75hp, 90hp, 115hp,
Common Issues With the Optimax Fuel Injection System
A very common misconception about the Optimax motors is that they are unreliable. As with any new technology advancements, they did have their bugs originally, but they were quickly sorted out by Mercury. It is not uncommon to see these motors reach a few thousand hours with little repairs. That being said they are rather complex motors and have potential to give you grief if they are not maintained properly. Because of the air injection on these motors they are also difficult to diagnose, especially for Techs that have not been trained on the specialized direct injection system. Issues such as a worn diaphragm, or cracked spring in the fuel regulator, air regulator, or Tracker valve can cause rough idle, hard start or surging issues. Clogged or inoperative fuel injectors or direct injectors can cause similar issues along with the potential for creating a lean condition which could cause premature wear or engine damage. An air compressor failure would not only leave you stranded out on the water, but can also contaminate the fuel rail and DFI injectors. Leaking Teflon carbon seals on the direct air injectors can cause a low compression reading, possibly tricking you into thinking that you have scored cylinder walls. Oil lines cracking or an oil pump failing could also spell and early end to your motor. Many of these issues can be tough to find or catch before they become a problem, and DIY mechanics often overlook such items and cost you money. These reasons and more are why we always recommend servicing and repairing your Optimax at a Mercury Marine Certified repair center or dealer.
How can you extend the life of your Mercury or Mariner Optimax?
Regular fuel system maintenance and checking all of the above items is key to letting your Optimax outboard live a long life. We can help you by performing a full fuel rail and injector cleaning. You send us your complete fuel rail or rails including both the air and fuel injectors, and we will disassemble them and ultrasonically clean everything back to new. Not only do we put them in the ultrasonic tank but we also flush specially formulated cleaning fluid through the rails as they are being cleaned. This fluid is circulated back through a 2 micron Racor fuel/water separating filter to ensure that no harmful debris will be put back into the rails. We also inspect the Tracker valve diaphragm and spring, as well as the fuel and air regulator diaphragms and springs for any tears or cracking, and re-assemble for you after cleaning. The air and fuel injectors are then tested using our Bosch certified equipment, and also ultrasonically cleaned. They are then re-tested for verification and re-assembled back into the fuel rail. The fuel and air rail assembly is now ready to be carefully packaged up and returned to you. You can now be 100% assured that your fuel rail system is in working order and ready for service.
Optimax Direct Injection Fuel Flow Diagrams

75/90/115 - 1.5 Liter - OptiMax Fuel and Air Flow Diagram Serial Number 0t801000 & Above
- Engine pulse fuel pump
- Fuel/water separator filter
- Vapor separator tank vent hose
- Air compressor inlet coolant hose
- Fuel outlet from high pressure electric fuel pump - 108 PSI
- High pressure air outlet - 94 PSI
- Air compressor
- Air compressor inlet air filter
- Cooling water routed from air compressor to fuel rail
- Direct inj

115/135/150/175 & 175 ProXS - 2.5 Liter V6 - OptiMax Fuel & Air Flow Diagram
- Fuel inlet from primer bulb
- Engine pulse pump
- Fuel line to water separating fuel filter (2-8 PSI)
- Water separating fuel filter
- Fuel outlet from VST
- Fuel inlet to low-pressure electric fuel pump
- Fuel outlet from low pressure electric fuel pump (7-9 PSI)
- Fuel inlet to high-pressure electric fuel pump
- Relief passage - unused fuel re

200/225/250 - 3.0 Liter - Optimax & Optimax Pro XS - V6
- Engine pulse fuel pump
- Fuel/water separator filter
- Vapor separating tank vent hose
- Fuel outlet from high pressure electric fuel pump (90 PSI)
- Bleed off from air pressure regulator, routed to exhaust adapter and exits through the propeller
- Air compressor inlet coolant hose
- Air compressor
- Air compressor inlet air filter
- High pressure air outlet - (80 PS
Optimax Fuel & Air Pressure Specifications

75hp /90hp /115hp 1.5L Inline 3
- Fuel Pressure - 109 ± 1 psi
- Air Pressure - 95 ± 1 psi
- Pressure Differential - 14 ± .03 psi
- Fuel Injector Resistance - 1.8 ± 0.1 Ω
- Direct Injector Resistance - 1.3 ± 0.3 Ω
115hp /135hp /150hp /175hp 2.5L V6
- Fuel Pressure - 90 ± 2 psi
- Air Pressure - 80 ± 2 psi
- Pressure Differential -10 psi
- Fuel Injector Resistance - 1.8 ± 0.1 Ω
- Direct Injector Resistance - 1.3 ± 0.3 Ω
150 Pro XS / 175 Pro XS 2.5L V6
- Fuel Pressure - 109 ± 2 psi
- Air Pressure - 95 ±2 psi
- Pressure Differential - 14 psi
- Fuel Injector Resistance - 1.8 ± 0.1 Ω
- Direct Injector Resistance - 1.3 ± 0.3 Ω
200hp /225hp 3.0L V6
- Fuel Pressure - 90 ± 2 psi
- Air Pressure - 80 ± 2 psi
- Pressure Differential 10.5 psi
- Fuel Injector Resistance - 1.8 ± 0.1 Ω
- Direct Injector Resistance - 1.3 ± 0.3 Ω
250hp 3.0 V6
- Fuel Pressure - 108 ± 2 psi
- Air Pressure - 93 ±2 psi
- Pressure Differential - 15 psi
- Fuel Injector Resistance - 1.8 ± 0.1 Ω
- Direct Injector Resistance - 1.3 ± 0.3 Ω
200hp / 225hp / 250hp ProXS 3.0L V6
- Fuel Pressure - 108.1-110.1 psi
- Air Pressure - 94.3 - 96.3 psi
- Pressure Differential 14.1 ± .03 psi
- Fuel Injector Resistance - 1.8 ± 0.1 Ω
- Direct Injector Resistance - 1.3 ± 0.3 Ω
300XS 3.2L V6
- Fuel 106-110 psi
- Air 91 - 95 psi
- Differential 15 psi
- Fuel Injector Resistance - 1.8 ± 0.1 Ω
- Direct Injector Resistance - 1.3 ± 0.3 Ω
OptiMax Fuel / Air Rail Service Kits


Above are the OptiMax fuel & air rail service kits. As you can see there are 2 different kits depending on which fuel and air pressure differential your motor requires. The chart below should help determine whether your fuel pressure regulator requires the 10psi or the 14psi spring. At the bottom of the page you will also see a download link to the service bulletin that these images were cut from. Mercury recommends using the CDS program along with the electronic pressure transducer to properly adjust fuel pressure after installing these regulator kits. If you don't have access to this software your Mercury dealer should be able to assist you.

You will also require the air regulator installation tool listed below. The part number is 91-889431, The air regulator spring is quite stiff and difficult to assemble without pinching the diaphragm.
Copyright © 2023 Canadian Fuel Injection Service - All Rights Reserved